> ## Documentation Index
> Fetch the complete documentation index at: https://docs.play.ai/llms.txt
> Use this file to discover all available pages before exploring further.
# Web Embed Tutorial
> Learn how to embed AI agents in your web applications
## Introduction
The PlayAI web embed allows you to integrate AI-powered interactions into your web application. This guide will walk you through the process of setting up and using the PlayAI web embed in your React application.
## Installation
First, install the `@play-ai/agent-web-sdk` package:
```bash theme={null}
npm install @play-ai/agent-web-sdk
```
## Basic Usage
Here's a step-by-step guide to implement the play.ai web embed in your React application:
If you haven't already, create an agent on [https://play.ai](https://play.ai).
```javascript theme={null}
import { useEffect, useState } from 'react';
import { open as openEmbed } from '@play-ai/agent-web-sdk';
```
```javascript theme={null}
const webEmbedId = 'YOUR_WEB_EMBED_ID';
```
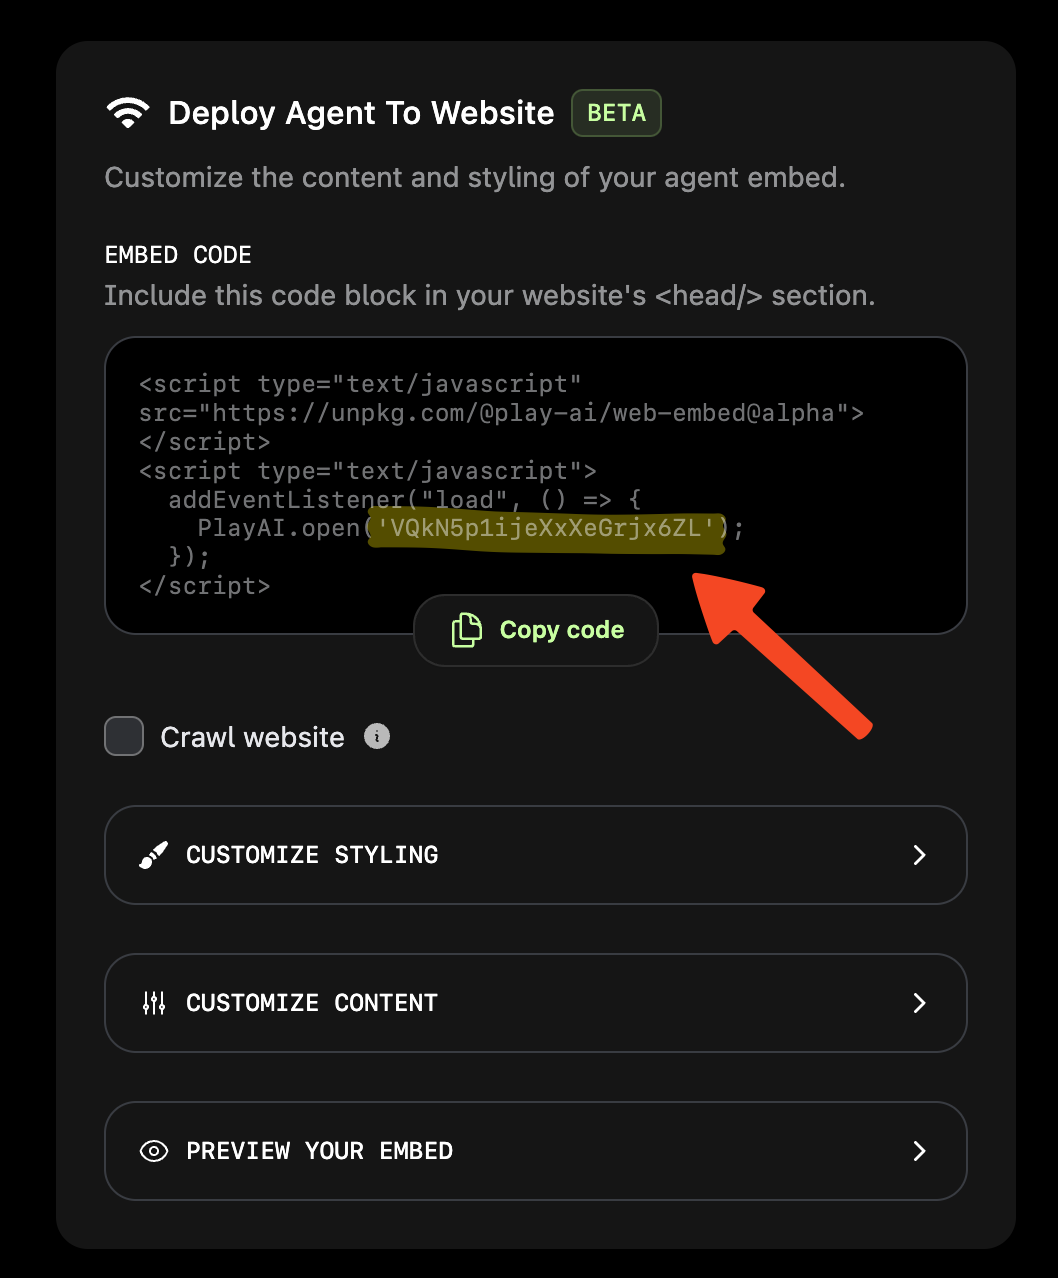
Replace `YOUR_WEB_EMBED_ID` with the actual ID provided by play.ai, which can be found in the Agent editor.
 ```javascript theme={null}
const events = [
{
name: "change-text",
when: "The user says what they want to change the text on the screen to",
data: {
text: { type: "string", description: "The text to change to" },
},
},
] as const;
```
Custom events are optional, but they allow you to define custom behavior for your agent, to allow it to execute javascript and interact with the page. Learn more about custom events here.
This example defines a single event called "change-text" that will be triggered when the user specifies the text they want to display.
```javascript theme={null}
const onEvent = (event: any) => {
console.log("onEvent: ", event);
if (event.name === "change-text") {
setText(event.data.text);
}
};
```
If you define custom events, you must implement an event handler to handle the events. Learn more about the custom event handler here.
This handler logs the event and updates the text state when a "change-text" event is received.
```javascript theme={null}
useEffect(() => {
openEmbed(webEmbedId, { events, onEvent });
}, []);
```
This `useEffect` hook initializes the web embed when the component mounts. See all the parameters that can be passed to `openEmbed()` here.
```jsx theme={null}
return (
<>
);
```
This example renders the current text in the center of the page.
## Full Example
Here's the complete example of a React component using the play.ai web embed.
```jsx theme={null}
"use client";
import { useEffect, useState } from "react";
import { open as openEmbed } from "@play-ai/agent-web-sdk";
const webEmbedId = "YOUR_WEB_EMBED_ID";
export default function Home() {
const [text, setText] = useState("Change this text");
const events = [
{
name: "change-text",
when: "The user says what they want to change the text on the screen to",
data: {
text: { type: "string", description: "The text to change to" },
},
},
] as const;
const onEvent = (event: any) => {
console.log("onEvent: ", event);
if (event.name === "change-text") {
setText(event.data.text);
}
};
useEffect(() => {
openEmbed(webEmbedId, { events, onEvent });
}, []);
return (
<>
);
}
```
View the live example [here](https://play.ai/embed/demo/change-text).
View the code [here](https://github.com/playht/web-embed-examples/blob/main/change-text/nextjs/app/page.tsx).
## Customization
You can customize the behavior of your AI agent by modifying the agent greeting and prompt. In this example, the agent is instructed to change the text on the page and end the call immediately after doing so.
```javascript theme={null}
const events = [
{
name: "change-text",
when: "The user says what they want to change the text on the screen to",
data: {
text: { type: "string", description: "The text to change to" },
},
},
] as const;
```
Custom events are optional, but they allow you to define custom behavior for your agent, to allow it to execute javascript and interact with the page. Learn more about custom events here.
This example defines a single event called "change-text" that will be triggered when the user specifies the text they want to display.
```javascript theme={null}
const onEvent = (event: any) => {
console.log("onEvent: ", event);
if (event.name === "change-text") {
setText(event.data.text);
}
};
```
If you define custom events, you must implement an event handler to handle the events. Learn more about the custom event handler here.
This handler logs the event and updates the text state when a "change-text" event is received.
```javascript theme={null}
useEffect(() => {
openEmbed(webEmbedId, { events, onEvent });
}, []);
```
This `useEffect` hook initializes the web embed when the component mounts. See all the parameters that can be passed to `openEmbed()` here.
```jsx theme={null}
return (
<>
);
```
This example renders the current text in the center of the page.
## Full Example
Here's the complete example of a React component using the play.ai web embed.
```jsx theme={null}
"use client";
import { useEffect, useState } from "react";
import { open as openEmbed } from "@play-ai/agent-web-sdk";
const webEmbedId = "YOUR_WEB_EMBED_ID";
export default function Home() {
const [text, setText] = useState("Change this text");
const events = [
{
name: "change-text",
when: "The user says what they want to change the text on the screen to",
data: {
text: { type: "string", description: "The text to change to" },
},
},
] as const;
const onEvent = (event: any) => {
console.log("onEvent: ", event);
if (event.name === "change-text") {
setText(event.data.text);
}
};
useEffect(() => {
openEmbed(webEmbedId, { events, onEvent });
}, []);
return (
<>
);
}
```
View the live example [here](https://play.ai/embed/demo/change-text).
View the code [here](https://github.com/playht/web-embed-examples/blob/main/change-text/nextjs/app/page.tsx).
## Customization
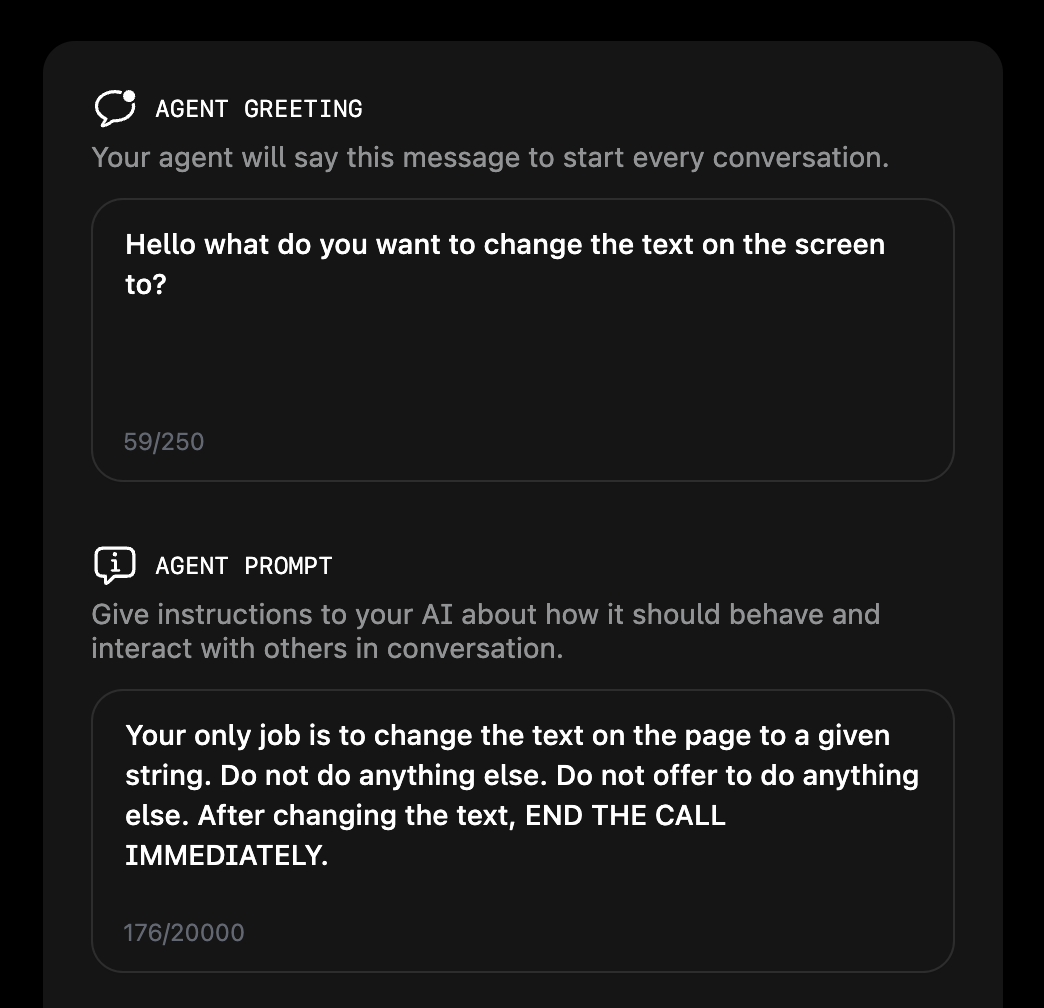
You can customize the behavior of your AI agent by modifying the agent greeting and prompt. In this example, the agent is instructed to change the text on the page and end the call immediately after doing so.
 ## Other examples
* [View other examples](/documentation/tutorials/agent/web-embed-examples)
## Other examples
* [View other examples](/documentation/tutorials/agent/web-embed-examples)